Upload VS Download
- 实验题目
- 头像定制
- 实验内容
- 文件上传和下载
- 实验目的
- 进一步熟悉资源服务器的搭建
- 进一步熟悉网络请求的基本过程
- 掌握利用中间件实现文件的上传和下载
- 实验过程
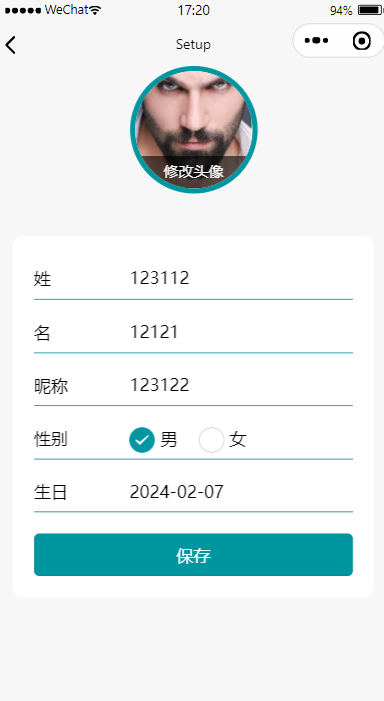
- 在个人中心页面的基础上,为头像增加导航,点击后跳转到设置页面setup继续开发
- 从资源服务器拉取用户信息,如果为空,则头像显示默认图片;如果不为空,则显示用户头像
- 单击修改头像可以重新选择头像,并同步更新到资源服务器
- 长按头像图片预览并下载
-

用户默认头像 - 知识点
- wxml:<view>、<image>、<form>、<radio-group>、<radio>、<picker>、<button>
- js:bindblur、bindchange、bindsubmit、bindchooseavatar、wx.request
- wxss:flex、border-radius、border、fixed、absolute
- API
- wx.chooseMedia(Object object)
- wx.uploadFile(Object object)
- wx.downloadFile(Object object)
- wx.previewImage(Object object)
- 中间件
- multer
- formidable*
- API接口
- /upload:头像上传
- avatar:头像name
- 效果图
-

- 实验过程
-
创建上传服务器并启动;也可以集成在资源服务器中;详细操作和完整代码,请参考 上传 - multerwxml - 先选择图片预览再上传;长按图片预览并下载
<view class="wrap">
    <view class="img-box">
        <image class="img" src="{{imgUrl}}" mode="aspectFill"  bind:longpress="downloadImg"/>
        <button class="btn" bind:tap="chooseAndUpload">更新头像</button>
    </view>
</view>
wxss - 定位,略js - 准备渲染数据data和临时数据uploadFileUrl;其中,imgUrl是默认头像,tempFilePath是选择图片后返回的临时路径,用以渲染头像和上传头像;uploadFileUrl保存上传成功后头像在服务器的路径,便于下载使用data: { imgUrl: 'https://cdn.pixabay.com/photo/2015/03/03/20/42/man-657869_640.jpg', tempFilePath: null }, uploadFileUrl: nulljs - 选择头像数量count指定1张;默认是9张
mediaType:类型指定是图片image
sourceType:指定从相册活照相机拍摄
changeImg: function () {
    wx.chooseMedia({
        count: 1,
        mediaType: ['image'],
        sourceType: ['album', 'camera'],
        success: res => {
            var tempFilePath = res.tempFiles[0].tempFilePath
            this.setData({
                tempFilePath: tempFilePath,
                imgUrl: tempFilePath
            })
        }
    })
}
js - 上传头像指定上传文件路径filePath:使用图像选择的临时路径
指定name为avatar,便于服务器分辨
指定服务器路由url
upload: function () {
    // 如果没有更改照片则提示更改后再上传
    if (!this.data.tempFilePath) {
        wx.showToast({
            title: '请您更改头像之后再进行上传操作',
            icon: 'none',
            duration: 2000
        })
        return
    }
    // 确认更改头像之后再上传
    wx.uploadFile({
        filePath: this.data.tempFilePath,
        name: 'avatar',
        // 实际地址视机房服务器环境配置
        url: 'http://10.10.151.178:3000/upload',
        header:{
            'content-type':'multipart/form-data'
        },
        success: res => {
            this.uploadFileUrl = JSON.parse(res.data).url
            console.log('上传成功')
            wx.showToast({
                title: '上传成功',
            })
        }
    })
}
js - 下载头像文件上传成功后,返回的头像图片路径保存在了数据中;利用它下载图片到本地
download: function () { if (!this.uploadFileUrl) { wx.showToast({ title: '请您上传头像之后再进行下载操作', icon: 'none', duration: 2000 }) return } wx.showLoading({ title: '图片下载中,请稍后……', }) wx.downloadFile({ url: this.uploadFileUrl, success: res => { wx.hideLoading() console.log('下载完成') wx.previewImage({ urls: [res.tempFilePath] }) } }) }运行小程序,选择图片并上传;在服务器目录下看到使用了时间戳的完整文件名字{ fieldname: 'image', originalname: 'bYmNOVO35pLd787bce43d31211e2a9fb482c28888418.png', encoding: '7bit', mimetype: 'image/png', destination: 'E:\\nodeServer/upload', filename: 'image1706875478704.png', path: 'E:\\nodeServer\\upload\\image1706875478704.png', size: 91117 } - 实验要求
-
按照以上步骤分别完成头像文件的上传和下载规范开发;独立完成;突出个人设计特点和风格实验报告:采用学院统一下发的 实验模板 文件,以文字说明,配以必要的效果图片或核心代码,展示并说明数据来源、实施过程、各部分功能、具体内容和实现细节;最后导出为PDF,按照要求命名,提交个人学习通作业未按要求在规定时间内提交视为无效,不得分相关格式规范,请参考 论文格式规范 Paper Prettier