内容 Content
- 商品仓库 goods.js 完善
- 详情页 DetailsView.vue 购物业务逻辑完善
- 购物车仓库设计 cart.js
- 购物车视图组件设计 CartView.vue
npm i nanoid
import { nanoid } from 'nanoid'

model.id = nanoid()
. 加载商品数据并清洗 → 渲染 → 生成购物车数据
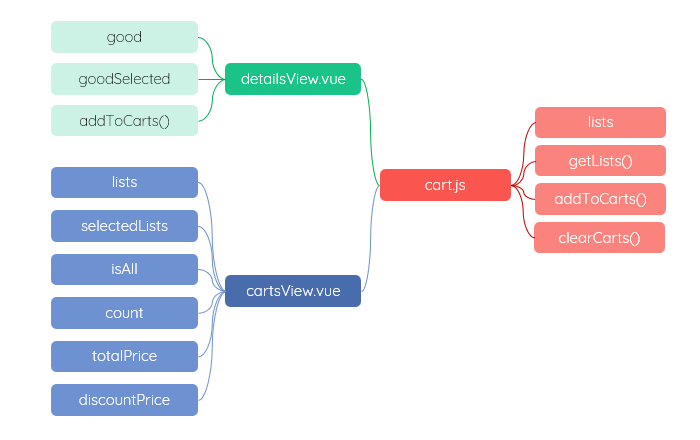
. 购物车固定定位在详情页底部;没有封装
. 基本结构,无数据绑定、无事件
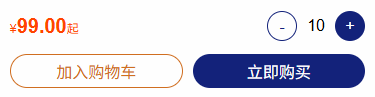
. 高度同主导航;网格布局;平分空间;保持间隔;其它价格部分单独设置结束对齐
. 按钮的初始化和相关变量均来自主样式文件 app.css
<div class="cart">
  <span class="price">¥<span>99</span>起</span>
  <div class="opers">
    <button class="oper dec">-</button>
    <div class="quantity">1</div>
    <button class="oper inc">+</button>
  </div>
  <button class="btn btn-cart">加入购物车</button>
  <button class="btn btn-buy">立即购买</button>
</div>
. 在 onMounted 中已经获取到了商品数据;需要准备添加到购物车的数据
. 利用解构处理/清洗数据,格式同原始数据保持一致;同名字段,后面的会覆盖前面的
. 增加一个数量字段 quantity,默认是1
. 处理规格 specification;规格组件的封装,请参考 组件双向绑定 defineModel - 规格组件 specification
. 这里没有处理甜点 dessert 和推荐商品 recommend
// 商品仓库 goods.js 中读取的数据
const good = ref({})
// 清洗后的数据,加入到购物车仓库 cart.js 中
const goodSelected = ref({})
onMounted(async () => {
  let res = await goodsStore.getById(route.params.id)
  good.value = res

  goodSelected.value = {
    ...res,
    quantity: 1,
    specification: [
      { name: 'cup', value: res.specification[0].options.find(item => item.sel == true).label },
      { name: 'ther', value: res.specification[1].options.find(item => item.sel == true).label },
      { name: 'sugar', value: res.specification[2].options.find(item => item.sel == true).label, }],
    dessert: [],
    recommend: []
  }
})
. 为数量按钮绑定单击事件
. 利用按钮的 disabled 处理越界;只判断下边界
. 这里使用内联事件实现
<div class="opers">
  <button class="oper dec" @click="goodSelected.quantity--" :disabled="goodSelected.quantity <= 1">-</button>
  <div class="quantity">{{ goodSelected.quantity }}</div>
  <button class="oper inc" @click="goodSelected.quantity++">+</button>
</div>
. 使用计算 computed() 处理;也可以使用监听 watch()
const total = computed(() => {
  return (goodSelected.value.price * (1 - goodSelected.value.discount) * goodSelected.value.quantity).toFixed(2)
})
. 为加入购物车指定事件 addToCarts
. 创建购物车数据项:增加新字段 productId,保存商品 id;商品原 id 字段可以保留,也可以移除
. 数据项的 id 可以在这里指定;也可以在购物车仓库中指定;这里由购物车仓库指定
. 跳转到菜单视图;这里使用替换 replace 模式
const addToCarts = () => {
  const cartItem = {
    ...goodSelected.value,
    productId: goodSelected.value.id,
  };
  cartStore.addToCarts(cartItem)
  router.replace('/menu')
  alert('Added to carts')
}
. 略
. 使用响应式数据替换掉上述静态结构中的数据
. 完善详情页中其它部分
. 更多效果自行完成
. 仓库创建 - 略
. 主要业务如下;可根据需求扩展
const lists = ref([])
. 为避免重复操作添加数据,可以预先准备一些核心测试数据
. 注意 id 和实际数据要区分开来
const lists = ref([
  { id: 100, title: "coffee", price: 9, discount: 0.2, stock: 10, quantity: 1 },
  { id: 101, title: "cup", price: 5, discount: 0.4, stock: 10, quantity: 1 },
  { id: 102, title: "code", price: 16, discount: 0.1, stock: 10, quantity: 1 },
  { id: 103, title: "cookie", price: 8, discount: 0.5, stock: 10, quantity: 1 },
]);
. 远程加载数据;这里返回测试数据
const getLists = () => {
  // ...axios fetch
  return lists.value;
};
. 如果商品不存在,则为当前商品添加新的 id 作为对应的购物车数据项的 id,该 id 会覆盖商品的 id;如果商品数据项已经存在,则数量相应的增加
. 也可以直接使用商品数据的 id,后续的查找相应的变化即可
. 其它业务:库存调整,需要使用商品仓库 goods.js;也可以放在订单中处理,库存才真正变化
const addToCarts = (product) => {
  const existingItem = lists.value.find((item) => item.productId === product.productId);
  if (existingItem) {
    existingItem.quantity += product.quantity;
  } else {
    // replace id with nanoid
    lists.value.push({
      ...product,
      id: nanoid(),
      create_time: Date.now()
    });
  }
};
const removeFromCart = (id) =>{
  lists.value = lists.value.filter(item => item.id !== id)
}
const clearCarts = () => {
  lists.value = [];
};
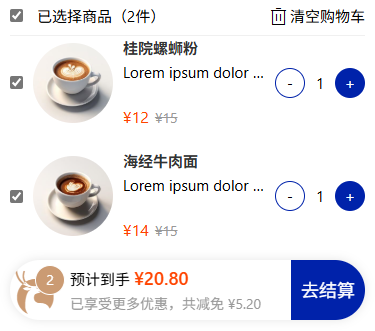
. 操作购物车数据:数据加载、全选、数量调整、结算、下单等
. 封装为一个组件
. 固定定位在菜单视图底部;弹性盒子方向调整为垂直;折叠时,由 footer 撑开;展开时,背景设为透明黑
. header 和 main 折叠时不显示 - 条件渲染
. header 设置外边距上为自动,撑开购物车
. main 指定最大高度;信息区可以设置单点溢出...
. footer 折叠时,背景为空;展开时设置白色
<div class="cart" :class="{ 'show-cart': isShow }">
  <header v-show="isShow">
    // ...
  </header>
  <main v-show="isShow">
    <div class="cart-item" v-for="item in 4">
      // ...
    </div>
  </main>
  <footer>
    <div class="cont">
      // ...
    </div>
  </footer>
</div>

也可以额外创建一个视图组件展示并操作购物车;注意补充相应的路由配置
. 待选商品 lists:数组;本地数据或使用 fetch 或 axios 加载远程数据
. 选中商品 selectedLists;数组
. 是否全选 isAll,布尔;默认是真,全选
. 商品数量总数 count;数值
. 商品价格总数 totalPrice;数值
. 商品折扣价格总数 discountPrice;数值
import { useCartStore } from '@/stores/cart';
const cartStore = useCartStore();
const lists = ref([])
const selectedLists = ref([])
const isAll = ref(false)
const totalPrice = ref(0)
const discountPrice = ref(0)
const count = ref(0)

onMounted(() => {
  // 待选商品 lists 和 选中商品 selectedLists 相同,默认全选
  lists.value = cartStore.lists;
  selectedLists.value = [...lists.value]
})
. 列表渲染遍历的是待选商品 lists
. 单个选择 checkbox 双向绑定的是选中商品 selectedLists;不要忘记指定 value 和 name
. 双向绑定 isAll
. 使用改变事件,判断是全选还是全不选
<input type="checkbox" name="all" v-model="isAll" @change="selectAllChange"/>all
const selectAllChange = () => {
  if (isAll.value) {
    selectedLists.value = [...lists.value]
  } else {
    selectedLists.value = []
  }
}
. 使用三元表达式
const selectAllChange = () => {
  listsSelected.value = isAll.value ? [...lists.value] : []
}
. 如果新长度和待选商品相等,则说明是全选
. 立即侦听
watch(listsSelected, (newval) => {
  isAll.value = newval.length == lists.value.length
}, { deep: true, immediate: true })
. 单击商品项的增加和减少按钮相应的调整其数量;并根据库存进行越界检测
. 这里使用内联事件方式;也可以使用函数方式
<button class="btn" @click="cart.quantity--" :disabled="cart.quantity <= 1">-</button>
<button class="btn" @click="cart.quantity++" :disabled="cart.quantity >= cart.stock">+</button>
. 确保侦听为深度侦听和立即侦听:便于页面渲染完毕时立即更新数据;或使用自动侦听 watchEffect
totalPrice.value = selectedLists.value.reduce((total, item) => total + item.quantity * item.price * (1 - item.discount), 0).toFixed(2)
discountPrice.value = selectedLists.value.reduce((total, item) => total + item.quantity * item.price * item.discount, 0).toFixed(2)
count.value = selectedLists.value.reduce((total, item) => total + item.quantity, 0)